

We measured the power consumption with the system resting at the Windows 7 desktop, representing idle values.
The power consumption of our entire test system (at the wall) is measured while loading only the CPU using Prime95′s in-place large FFTs setting. The rest of the system’s components were operating in their idle states, hence the increased power consumption values (in comparison to the idle figures) are largely related to the load on the CPU and motherboard power delivery components.
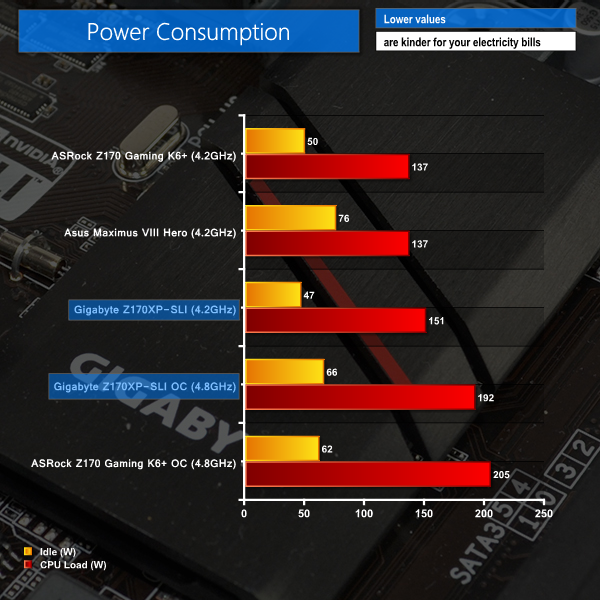
The stock (4.2GHz) clocked power consumption numbers paint somewhat of an inaccurate picture due to our forced workaround to reach the simulated MCT frequency. The load power draw value is only 10% higher than ASRock's and Asus' due to a higher CPU VCore level being set by the auto voltage configuration, rather than the competitors' MCT setting. This load result can be ignored, however the idle number is particularly positive.
Idle power consumption numbers for the overclocked system remain positive. The overclocked Gigabyte board's 13W lower load power draw reading compared ASRock's part is due to the former dropping its load VCore level to around 1.38V. This helps shave a few Watts off the system power usage and degrees off the CPU temperature, although it does present additional head-scratching when trying to pinpoint a stable processor overclock.

I fail to see how this board is slower than the other 2 as the frame testing is within margin of error.
When one activates the XMP profile it automatically activates a memory stability option that should be set to normal to regain those 10Gbps extra. I don’t remember exactly how that option is called but just search for a memory related option that says “compatibility” or “stability” and switch it to “normal” instead.